Friday, July 12, 2013

The Whole Story on the snake drama

So yesterday on Facebook, I posted our morning adventure and last night when Greg was reading through my posts, I realized that he didn't have any credit for helping.  I told him I wanted to put it in the blog....so here is the full version of the snake trapped in the garage door.

Greg's mom had been visiting since Monday and was leaving Thursday.  On Thursdays, we (me and the girls) try to do the 10am summer movie series because it's a cheap date.  So, we said our good-byes to "Nanny" and went to the car.  Her ride to go back to KY would be there is less than 5 minutes and we were going to be late already.  (I like to be there around 9:45 to get a good seat.)  So, at about 9:30 The girls were in the car and I tried to raise the garage door and it would only go up about 2 feet.  I put it back down.  Tried again...it stopped.  Seriously.  I don't have time for this to happen.  They are looking so forward to seeing that movie!  I put it back down and started looking for what could be the problem.  I saw a black thing lodged in the track.  There it is! 

Oh frickitydoda, it's moving.....wait, is that what I think it is?  I went around the outside of the garage and he is about a foot on the other side sticking his tongue out at me.  That stinker had tried to crawl from inside the garage to outside.  Well, he sure didn't go fast enough and this means he was probably in the garage when Greg left for work!  Bwahahahaha!  How in the world did this happen!?  Well, too late for him...he's damaged from the garage door and clearly he can't get out.  He's stuck....tight in the track of the door.  

Now Faye shows up (Nanny's ride) and they smiley faced leave me there with two kids and a snake.  (I think Faye would have helped me, but I was in shock over the fact that we had a 4 ft snake in the garage and I didn't want the girls to watch her kill it either.)  

I sent the girls inside and told them what was going on....for them to watch TV and I would come get them in a few.  I go down to the building and get a spade, a hard yard rake and a pair of loppers. Yesterday I said "hedge trimmers"....I looked that up and um....I did NOT use electric hedge trimmers on that snake.  Shew that would have been messy.  So, I had to Google my exact tool this morning and they are "loppers"... :)  never knew that.  I talked to myself a lot and prayed and decided that if I'm going to make it to the movie, I better get going.  Be the mom and take care of business, so we can go eat movie popcorn see a flick we actually own on the big screen!  At 10:05ish....I called my friend that I was meeting at the movies and I explained that there was no way we were going to make it.  She and Lendi's little buddy would be on their way to our house instead.

By this time, I have called Greg's work phone, his work cell phone and his personal cell at least 10 times.  I texted the following "You need to answer your phone I'm fixing to call its semi emergency but everyone is fine" I called....he didn't answer!  I was getting very annoyed, but he did call back and I found out he was in a meeting in Cleveland with his boss :)  Sorry about that, but um....you have a snake in your garage door and I can't get out of the garage and uh....you and Shawn need to get over here and take care of it!!!  I think he and Shawn thought that was funny (I was being serious.)  Greg would be on his way.

Seriously y'all, I wasn't trying to be a superwoman....I just wanted to make the 10am movie for my girls!  So, I had already killed it and gotten my kitchen gloves and pulled and yanked as hard as I could to get him unwedged.  Wasn't happening.  

The great thing about Greg being in Cleveland was that it's not that far from our new house and it's on his way back to work.  By the time he got there, he was clearly like...."oh my word" when he pulled in the drive way....because (graphic visual here) his view would have been "a decapitated snake is hanging out my garage door and there's blood...and there's my woman with some purple kitchen gloves and a diet mountain dew" when he pulled into the driveway. 

He assessed the situation and we agreed that we needed to pull him from the inside as much as we could.  I seriously thought he was impaled by the track.  He was in the curve and there are some places there that...well, hard to explain, but I thought he was injured from the inside and going to die anyway.  I had on the gloves, so I pulled as hard as I could.  I mentioned yesterday that Greg was moral support and he was because the snake came un-lodged from the track!  I think him being there made me stronger :)  He was still stuck, but he wasn't in the track.  So, Greg got a tool out of the AT&T truck (looks like one of those things you open the water meter lid with) and pulled it through to where he was trying to exit. Clearly not what that tool was designed to do....but who cares.  THEN and here's the kicker.  We had to open the garage door.  At this point, I did experience a little anxiety....I'm not going to lie.  I held the snake and Greg opened the garage door.  He's yelling (not loud, but loud enough to hear over the opening of the door) "Pull it!  Pull it!"  Oh my word....it fell out of the door and I'm still holding it because I don't want blood everywhere.  I took it around to the driveway and stretched him out for a picture.

The kitchen glove is there for comparison.  We figure somewhere between 3 1/2 and 4 feet from tip to tip.  Holy cow. 

photo.JPG


Walking with it to the woods to throw him to the flying critters (we have a hawk and 2 owls that live around here), our friends show up....just in time for lunch!  LOL, just kidding...but it is funny to think back about how we used to dissect animals in college and then go eat together. 

Sigh.....yes.  I had a nightmare last night.  Yesterday when we finally got out of the
house, I took the girls to lunch.  A sit down lunch at Los Potros....no fast food and screaming kids at a playground.  I was a little frazzled and needed some sweet tea with chips and salsa.  Next door to that is the Tractor Supply company and I went in there to get some snake repellent.  I ended up not buying it, but the lady explained that it messes with their nose and they just go away...perfect.  I want them to catch mice, just catch them out in the woods.  Apparently that was on my mind, because in my dream, I'm sprinkling this stuff all around the house thinking that it was going to make the snakes stay away.  I got to the lower driveway and a very large, triangular headed snake was there.  I squeezed my snake repellent right on it's head and it didn't affect it at all.  He chased me until I woke up.  
 

It's a new day.....Thank God!

Jana


Monday, July 8, 2013

Shhhhhh! DON'T tell Greg.....

...that he just completed his first, very own, Pinterest project!!!  Bwahahahaha!
Since we've bought this house that required a redo of every room (mostly just wall paint)...Pinterest has been my "go to" for various ideas from color to décor.  We have this lovely gold fireplace cover that is the eyesore of the living room.  We spend a lot of time in there and hopefully this fall we can enjoy either the gas logs (or if I have my way by fall....an all natural wood burning fire.)  So, of course on Pinterest I read that you can use the heat resistant Rustoleum spray paint (that's used for outdoor grills, etc) to update the gold fireplace cover!!! When he started talking about what to do about it, I casually mentioned that I've "heard of people spray painting them with the heat resistant paint".  Hook, line and sinker...he bought the paint and did it yesterday!  The history behind that story is that I have used the phrase "well, I saw on Pinterest....blah blah blah...." and he's so over that phrase.  With me, it's just about as common as "whatever". 

Here's the before:


And here's the AFTER! 

Any ideas for what to put above it??  It's a lot of space and goes to the ceiling...mirror?  Large art? 
True story: he got to the point where I had to start saying "you know there's a website I like that had the idea to ---(fill in the blank)"  We were to the point of hanging pictures in the foyer and I said something like..."you know there's a website that I like that says to use toothpaste on the back of the framed picture to show exactly where to put the nail instead of guessing how far down the nail should go from the top of the frame" 

Here's his face when he felt as stupid as the rest of us for reading Pinterest and having light bulb moments:


And then he said....OK you can say Pinterest for another month.

Have a GREAT day!
Jana
Tuesday, July 2, 2013

Half Bath Complete!

I'm way excited about the half bath being finished.  Greg installed the last of the plumbing last night.
We had been without a sink in there for several weeks and really couldn't find what we were looking for....to be quite honest, we couldn't agree on a vanity that we both liked!  I wanted a piece of small furniture and a stone sink on top.  He didn't want to cut a hole in a perfectly good piece of furniture.  We had a quote for a granite top on the former cabinet...way too expensive for a 1/2 bath and that vanity was too big anyway.  (That's why I ripped it out!)  We had looked at Lowe's and Home Depot to start....then branched out to some specialty stores.  Again, just not finding what we wanted.  We had to get plumbing supplies for the girls' bathroom redo and just ventured over to the vanities at Lowe's.  Viola!  It was a new display and we bought it on the spot.  SO, here it is! and here is a shot of the before and afters just as a reminder.  It's the only room in the house that is 100% made over, LOL, I'm glad it happens to be the bathroom.


Can you believe that???!!  It's a great color and even though its a very small 1/2 bath, the smaller sink gives it a roomy-er feel. 


Have a great day!
Jana


Sunday, June 30, 2013

Girls' bathroom floor: part 2 of 3

The easiest part of the floor was laying the tiles that didn't have to be cut!  I sanded and scraped and sanded some more to make sure the floor was clean and ready for the peel-and-stick tiles we chose.  Why peel-and-stick???  I'm not sure.  I didn't like the ceramic tiles that we had in our last house.  They chipped way too easy.  I wanted something a little more robust in the girl's bathroom, but I'm not crazy about having the real thing (any kind of stone tiles) when they are young.  I just have this fear of them slipping and cracking their head open or breaking an arm.  I think price factored in some and the fact that these look really awesome without being the real thing.  I hope I made the right decision. 

Here's where I left off: 


And here it is about half way finished...I say half way because of the cutting and filling in still left to do.  BUT also the baseboard needs to be added in behind the toilet, the quarter round installed and the toilet put back in. (And again a sideways pic....any suggestions?)


Tile and grout complete and a close up view below that!


And here it is DONE!  The quarter round is all new....
So, this tile was really easy.  The grout wasn't bad either.  It could have been done in one day, but I have two constant (sweet) interruptions :-) 


Yeah, the wallpaper is a different phase altogether.  Have you ever read "If you give a mouse a cookie" by Laura Numeroff?  That's me with wallpaper...if there is a little edge, I have to pull it!  I suppose some suggestions for wall color would be good now... 

Part 3 of 3 will be tiling the first section (room 1) of the bathroom.  I'll post when it's complete!

I'm feeling much better....just a cold....and I needed a day off anyway!
Have a great 4th celebration!
Jana


Girls' bathroom floor: Part 1 of 3


The bathroom that the girls use is layed out as 1 sink and a closet -> door -> 2nd sink with toilet and tub/shower. 

This post will consist of the redo of the 2nd room flooring (and a little more.)  Last week, I took up the linoleum that was in this section.  Let me back up and start by saying....I have absolutely NO idea what I'm doing.  I can be pretty handy, but I've never done a floor.  Fortunately, we live in a time of YouTube and Google and I can find just about anything at all hours for all projects.  There are many before, during and after pictures and I'll caption each one with the explanations. 

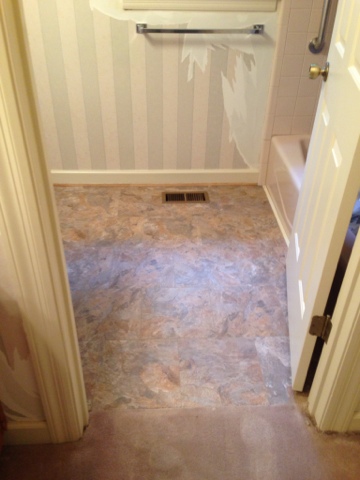
View from the hallway into the "foyer" area of the girls suite and into the bathroom.
 
This view is from room 1 looking into room 2...and this is the linoleum that will be replaced!!!
 

Why is this sideways!?  You can tell that linoleum comes off in two layers...the plastic layer is easy...the paper layer requires patience.  Lots of it too!  Thankfully, a friend of Greg's let us borrow a heat gun and a super duper scraper for the paper and glue.  That heat gun was THE key to this project. 


 And looky what I found by the potty! :-/ Not happy.  (And I'm definitely not happy that my pics are loading in quacked up directions.)  Doesn't appear to be any moldy areas; mostly just rotten wood.  I bleached all of it anyway, just to be safe.

We weren't lucky enough for the wood rot to be confined to the top layer.  The subfloor was completely rotten.  Both layers had to be replaced. ($$$)

We spent an entire day cutting and sawing....many hours spent making sure everything was perfect.  After all, you don't want the toilet to be unsteady or you may take a spontaneous ride straight to the basement!

After removal of all things black and rotten...Thank GOD that it was beautiful outside Saturday.  The girls played all day and allowed us to get this portion of the project taken care of. 
 
The floor is now ready for the tile to be installed.  It looks like several easy steps, but I'm telling you...prepping a floor that had linoleum was time consuming.  I'd rather peel wallpaper blindfolded and with one arm behind my back.

In addition, the plumbing for the toilet is new.  I now have words in my vocabulary (like flange) that I can now use if you ever want to talk to me about your toilet! 

 
 I have worked myself straight into bed.  I do not envy people who do flooring for a living AT.ALL.  I think this bathroom is going to look awesome!  I'm super excited to see it finished.  For now....I'm finished.  I need a massage and a pedicure :)

Have a wonderful week,
Jana

Monday, June 24, 2013

A shelf and a sneak peek!

Shew.  We took a much needed vacation to Gulf Shores, AL June 8-15th.  We met my sister and her family and my mom and step-father there for the week.  It rained the first 48 hours.  I thought we would all freak out before we saw the sun.  Alas, we had a great trip and got a little tan in the process. 

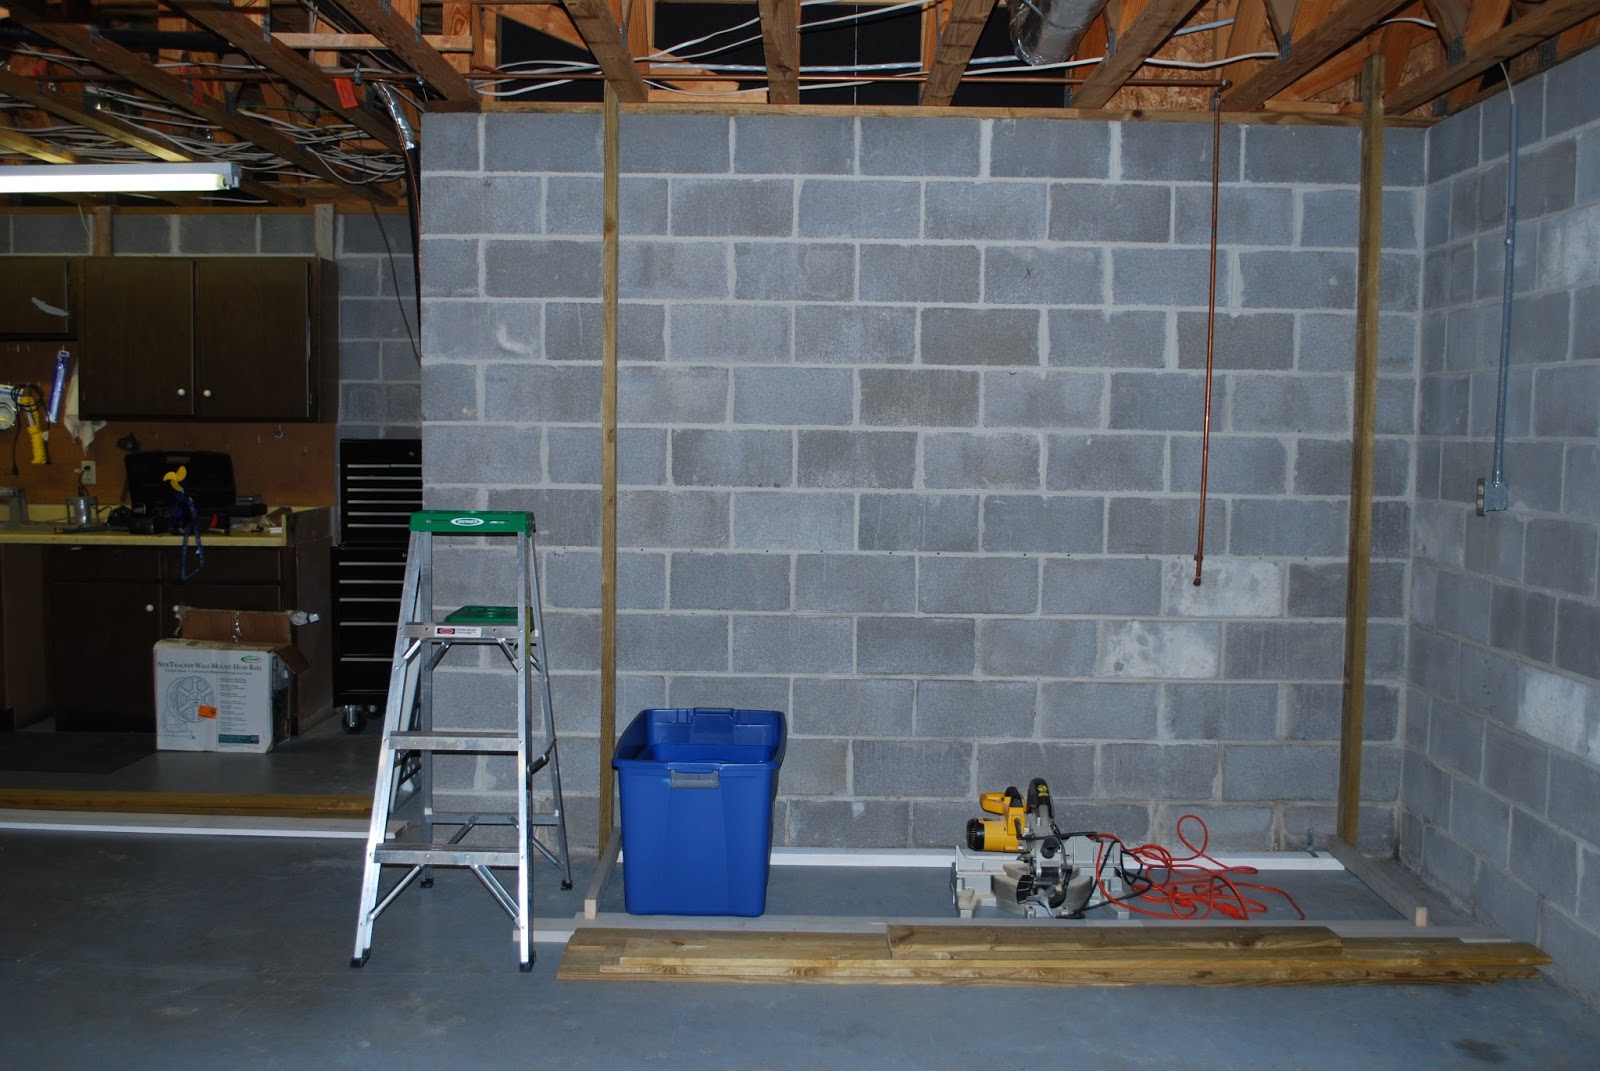
When we got home, we attacked the house again....full steam ahead.  This post will be Greg's project.  We have a large unfinished basement and we also have a lot of our holiday themed décor in large plastic containers....so he built some shelving for them!  He is very organized.  I'm organized, but when it comes to cleaning out the refrigerator or the pantry....he's the man.  (Really, I just play stupid so he'll do it.)

So, here's the before:


I fuss at him ALL the time for wearing these stupid flip flop things, shower shoes, whatever they are called....on a ladder of all places.  He wears them moving furniture, doing yard work.  You wait, he's going to fall because of them. 


And the after:  It's a good start on getting all of the boxes off the floor, but looks like we'll need a few more sets of these. 
A large portion of the lumber was repurposed.  I think he only had to buy a couple pieces!  The previous owners had built something similar in the very middle of the basement, so he disassembled it and used the larger/stronger pieces in the frame. 


 Here's a sneak peek of the master bathroom.  I'm sorry, all I can do is laugh.  I laugh because I just flipping peeled all the wallpaper out of that half bathroom and it was a little harder than I thought it would be.  This paper isn't bad....but there's a LOT of it.  It's also country blue and mauve.  The same colors my mom used when she and Ron built their first house together in 1988.  And it's floral!  The tile.  I can't wait to get a chisel and hammer and go to town on this bathroom.  I anticipate demolition to begin in March of 2014.  In the meantime, if the girls are bored....they get to help peel wallpaper and they love it!  (They are crazy like that.)

 
I hope you have a blessed day.  Any suggestions for color in this Master Bathroom!?  I have an open palate and mind. 
 
Jana

Wednesday, June 5, 2013

Half Bath Redo

Today's entry is a complete redo (minus replacing the toilet) of the half bath.  I have never taken down wallpaper before and just a heads up....all of the bathrooms have wallpaper.  So by the time I'm finished with this house, I'll be a professional.  :)
Here is the before:


The vanity is solid oak.  It's beautiful, but it's HUGE for a 1/2 bath. 
The top is an outdated cultured marble.

Don't you LOVE this wallpaper????
 Because this room is tiny, I'll have to help with some details so you can envision it.  The light fixture is gold, the faucet is gold and the toilet paper holder is....you guessed it!
I tried the Piranha system sold at Lowe's to remove the wallpaper.  I may have more of an opinion after doing the other two bathrooms.  This wallpaper is foil, which may be why it came off in two layers rather than as a whole sheet.  It wasn't terrible, just time consuming and I kept hearing my high school English teacher say "patience is a virtue." :)

The paint I picked for this room is only on the back wall behind the potty.  The other walls are a lighter shade of the same color...just to keep it from being really dark in a small room.  Here's the reveal and then the story behind it.


I'm having a hard time inserting a close up above the potty....


  • Greg painted the gold fixture in a satin nickel....he also painted the toilet paper holder too.  It's recessed and I'm almost positive they don't make those any more!  We didn't see them in any of the stores, but we didn't look super hard either.  I'm pretty pleased with how the fixture and TP holder both turned out.

  • After peeling off the wallpaper, the walls had to be spackled and sanded.  This was crazy time consuming.  I thought the wallpaper would come off and I could just paint.  OH NO....that's not the case.  The walls were primed, which definitely helped, but several areas (especially around the sink) were extremely difficult to get smooth.  I hope you'll never notice, but it's not perfect around the sink alcove.  I spackled and sanded and painted, the spackled and sanded and painted again.  It was obvious that when the house was built, the intention was to keep that vanity in there until the end of the world.
New baseboard and 1/4 round.....Looks SO good....the picture just doesn't do it any justice at all!
(And I'm claiming about 80% of the installation.)


Here are a few pics from the past week. 

I'm pretty sure the side guards were superglued to the wall....They were really hard to remove....
and tore up the sheetrock :(

This was my workspace for a week!

We had to remove the door to get the vanity out....the house was built around this vanity!


Would I do anything different?  YES!  I really wanted a pedestal sink and due to the installation of the pedestal, it's not going to happen.  This is totally fine and the options are wide open.  What I would do different is to research sinks FIRST and then proceed.  For now, you can use the 1/2 bath, but you can't wash your hands!  Searching for a mirror too....

Will post more when it's 100% complete.

Enjoy your day....and give me your feedback?  What kind of sink and mirror would you use!?

Jana